How to Tune a Guitar
Step-by-step guide to tuning a guitar with EasyTuner: EADGBE reference tones, microphone strobe dial, cents readout, auto-advance, and tips for beginners.
Learning how to tune a guitar is the single most important habit you can build as a player. Even perfect finger technique cannot save a guitar that is even slightly out of tune — chords sound muddy, melodies clash with backing tracks, and your ear learns the wrong pitches. The good news is that tuning does not require expensive hardware. With a quiet room, a smartphone or laptop, and EasyTuner's free online guitar tuner at easytuner.org, you can bring a six-string guitar to concert pitch in just a few minutes.
This guide walks you through the entire process using the tools built into EasyTuner: reference tones you can hear by ear, real-time microphone feedback on the strobe dial, cent-by-cent accuracy readouts, and auto-advance that guides you string by string through standard EADGBE tuning. Whether you are picking up a guitar for the first time or refreshing skills after a long break, follow the steps below and you will have a reliably tuned instrument ready to play.

What Is Standard Guitar Tuning (EADGBE)?
Before you touch a tuning peg, it helps to know what "in tune" actually means for a six-string guitar. Standard tuning — written EADGBE from the lowest (thickest) string to the highest (thinnest) — is the default for nearly all beginner lessons, song tabs, and instructional videos. Each letter names the open pitch of that string when it is not fretted.
In scientific pitch notation, the six open strings are E2, A2, D3, G3, B3, and E4. The low E vibrates at roughly 82 Hz; the high E rings near 330 Hz. See Guitar String Frequencies for the full Hz chart. Every other common tuning — Drop D, DADGAD, open chords — is a variation on this foundation, so mastering standard tuning first pays off everywhere else. For what EADGBE means and why it is the default, read Standard Guitar Tuning. EasyTuner loads EADGBE by default on the home page, and the fretboard labels each string with its full target note so you always know which pitch you are aiming for.
What You Need Before You Start
Gather a few basics and tuning becomes straightforward instead of frustrating.
- A six-string guitar with turning pegs that move smoothly — stiff or slipping pegs make fine adjustments difficult.
- A phone, tablet, or computer with a built-in microphone and a modern browser (Chrome, Safari, Firefox, or Edge).
- A reasonably quiet space. Fans, traffic, and television audio can confuse pitch detection.
- Optional but helpful: fresh strings, which hold pitch better once they have settled after a day or two of playing.
Open EasyTuner and Allow Microphone Access
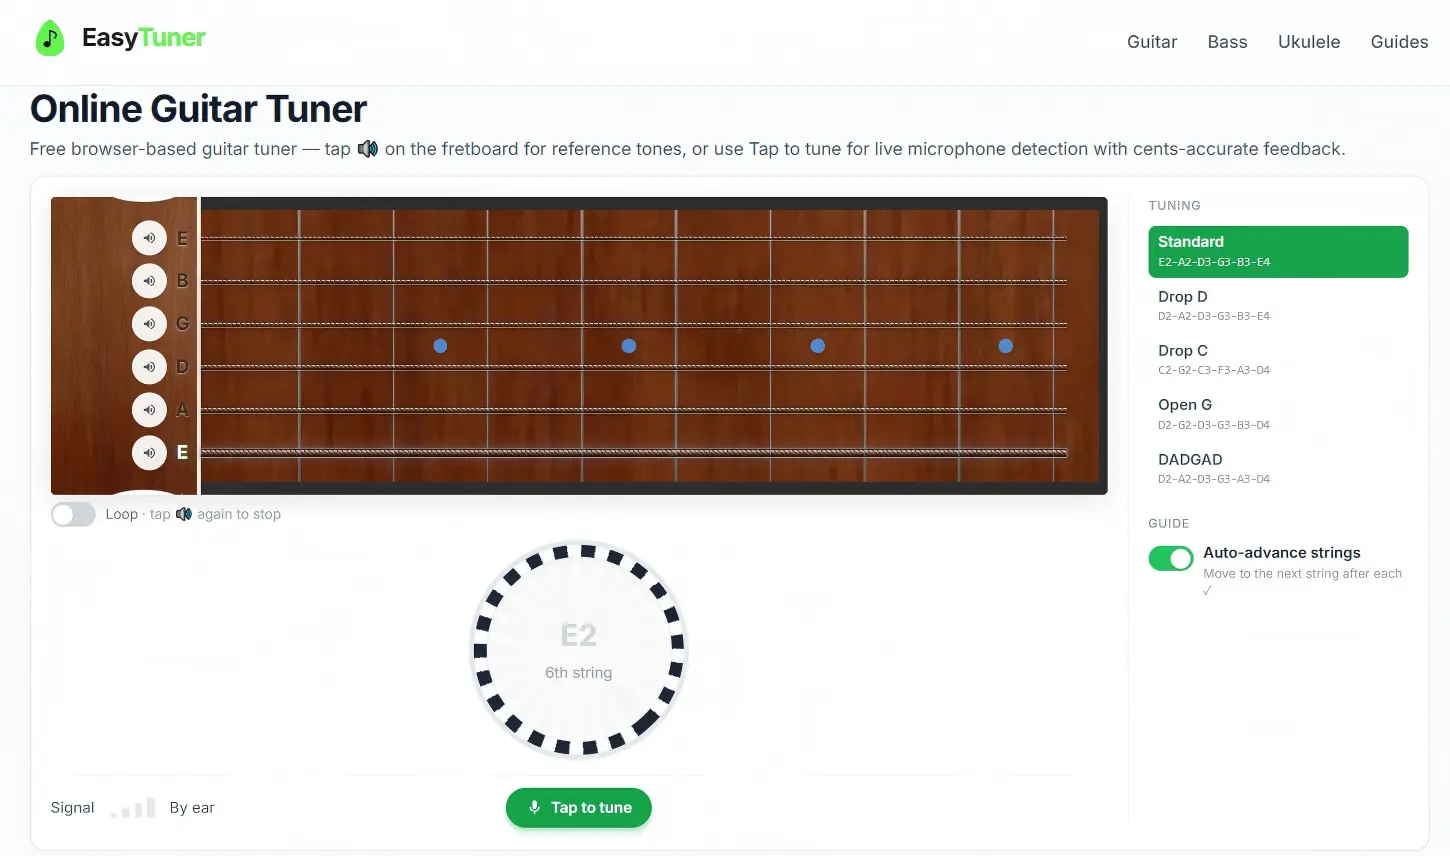
Navigate to the EasyTuner home page — the online guitar tuner loads immediately with standard EADGBE selected. You will see a visual fretboard showing all six strings, a tuning chart listing each target note, and a large strobe dial below. If you play alternate tunings regularly, use the tuning selector in the sidebar to switch (for example Drop D or DADGAD); this guide focuses on standard tuning, which is where every guitarist should start.
When you are ready for microphone-based tuning, press the Tap to tune button. Your browser will ask for microphone permission — choose Allow. EasyTuner processes audio locally in your browser; nothing is uploaded to a server. Once the mic is active, the highlighted string on the fretboard tells you which open string to pluck next. If you prefer to tune entirely by ear first, skip the microphone for now and use the reference-tone speakers described in the next section.
Tune by Ear with Built-In Reference Tones
Ear training and electronic tuning complement each other. EasyTuner places a speaker icon beside every string on the fretboard. Tap it to hear a clean reference tone at the exact target pitch — low E2 on the 6th string, A2 on the 5th, and so on up to high E4 on the 1st string. Listen closely to the sustained note, then pluck the same open string on your guitar.
Turn the corresponding tuning peg slowly. As the string pitch approaches the reference, you will hear the two notes start to blend. When they match, the beating or wobbling sound between them disappears. If you are unsure which direction to turn, remember: tightening the string (turning the peg so the string wraps tighter) raises the pitch; loosening lowers it.
Enable the Loop toggle below the fretboard to keep the reference tone playing continuously while both hands are free to adjust the peg. Loop is especially useful on the low E string, where pitch changes can be subtle and easy to overshoot. Many experienced players tune the 6th string by ear first, then use the microphone for precision on the remaining strings — EasyTuner supports that hybrid workflow without switching apps.
Fine-Tune with the Strobe Dial and Microphone
Reference tones get you close; the strobe dial locks you in. After pressing Tap to tune and plucking the highlighted open string, watch the circular display. Rotating stripes mean your pitch is still off — the faster they spin, the further you are from the target. As you approach the correct note, the stripes slow down and eventually freeze when you are within a few cents of perfect pitch.
Below the dial, EasyTuner shows the detected note name, your deviation in cents (one cent equals one hundredth of a semitone, or roughly one fret divided into a hundred parts), and plain-language guidance: Tune up if the string is flat (too low) or Tune down if it is sharp (too high). Aim for the green in-tune zone — typically within about five cents of the target. When a string is locked in, a checkmark appears beside it on the fretboard and the progress bar advances.
Pluck with a firm, consistent attack near the middle of the string or over the 12th fret — not so hard that the note warbles, not so softly that the mic barely registers. Let the note ring for at least a second so the tuner can stabilise its reading. If the display jumps wildly, check for background noise or try moving closer to your device's microphone.
String-by-String: Lowest to Highest
With auto-advance enabled (the default setting), EasyTuner moves to the next string automatically after each one is tuned, working from the 6th string up to the 1st. This order is intentional: lower strings carry more tension influence on the neck, so tuning them first helps the higher strings stay stable. You can turn off auto-advance in the sidebar if you want to jump between strings freely — useful when only one string slipped out during a session.
Work through each string using the steps above. Use the chart below as a quick reference while you play:

- 6th string (thickest) — Low E / E2 (~82 Hz). Turn the peg at the headstock end of this string until the strobe settles on E or the reference tone matches.
- 5th string — A / A2 (~110 Hz). Pluck the open 5th string only; avoid accidentally hitting adjacent strings.
- 4th string — D / D3 (~147 Hz). Check that the tuner reads D, not a nearby note like D# — playing the wrong string is a common beginner mistake.
- 3rd string — G / G3 (~196 Hz). The wound G string can take a moment to stabilise; pluck twice if the first reading flickers.
- 2nd string — B / B3 (~247 Hz). Plain steel strings react quickly; make small peg adjustments to avoid overshooting.
- 1st string (thinnest) — High E / E4 (~330 Hz). Go slowly — this string is easy to snap if you tune too high. Stop if you hear excessive tension.
Track Your Progress and Verify the Full Set
EasyTuner's fretboard gives you at-a-glance feedback: untuned strings appear neutral, strings that are close show partial progress, and fully tuned strings display a checkmark. The bar above the fretboard fills as you complete the set. When all six strings show checkmarks, strum a few open chords — E major, G major, D major — and listen for beating or dissonance between notes that should sound consonant.
If one chord still sounds wrong, isolate individual strings again rather than assuming the whole guitar is fine. Often a single string has drifted by ten or twenty cents while the others held. Re-pluck that string with the microphone active and nudge the peg until the checkmark returns. Playing for five to ten minutes can pull strings slightly flat, especially on a new set — a quick second pass through all six strings after a short warm-up is normal professional practice, not a sign of failure.
Common Problems and How to Fix Them
Even with a good tuner, a few recurring issues trip up beginners. Recognising them saves time.
- Wrong octave detected — If the tuner shows a note far from your target (for example B when you expect E), you may be plucking the wrong string or the string is so far out of tune it registers as a different pitch entirely. Rough-tune by ear with the reference speaker first, then switch to the mic.
- Peg slips after tuning — Older guitars sometimes have worn tuners that do not hold tension. Tune slightly sharp, press the string into the nut slot, then back down to pitch. Consider having tuners serviced if slipping persists.
- Background noise interference — Air conditioners and conversation can confuse pitch detection. Move to a quieter spot or hold the guitar closer to the mic.
- New strings won't stay put — Stretch each string gently by pulling it away from the fretboard after tuning, then re-tune. Repeat two or three times during the first day.
- Browser blocked the microphone — Click the lock or camera icon in your browser's address bar and reset the microphone permission to Allow, then reload EasyTuner.
Best Practices for Accurate, Long-Lasting Tuning
Small technique habits make a measurable difference. Always tune up to the note rather than down: if you overshoot sharp, loosen the string below the target and approach again from below. Strings settle more reliably under increasing tension than decreasing tension.
Tune before every practice session and again after vigorous bending or heavy strumming. Temperature and humidity shift wooden necks enough to matter, particularly when moving a guitar between rooms or taking it outdoors. Store the guitar in a case when not in use to slow environmental drift.
If you do not have microphone access — on a shared computer, for example — you can still use EasyTuner's reference tones exclusively, or tune relative to a single known string: match the 5th fret of the low E to the open A string, then continue the fifth-fret method up the neck (with the exception that the 4th fret of the G string matches open B). Electronic tuning is faster and more precise, but ear skills built through reference tones stay valuable for decades.
When to Explore Alternate Tunings
Once standard EADGBE feels comfortable, you might lower the 6th string for Drop D, explore DADGAD for folk fingerstyle, or try open G for slide playing. EasyTuner includes dedicated pages for popular alternate tunings under Guitar Tunings in the navigation — each page loads the correct string targets, reference tones, and fretboard layout for that tuning so you are not guessing note names.
Not sure whether to stay in standard or drop the 6th string? Read Drop D vs Standard Tuning for a side-by-side comparison. Return to standard tuning before learning new songs from mainstream tabs, and always re-tune fully when switching between tunings. A guitar that sounds great in Drop D will sound wrong playing standard-tuned repertoire until every string is brought back to EADGBE.
Start Tuning Now
Tuning a guitar is not a one-time lesson — it is a ritual that connects you to the instrument before every song. With EasyTuner's reference tones, strobe dial, cent readout, tune-up and tune-down hints, auto-advance, and visual progress tracking, you have everything needed to go from silent strings to a concert-ready EADGBE setup in one sitting. Open the tuner, allow your microphone, pluck the low E, and work your way up. Within minutes your chords will ring clear, your practice will train your ear correctly, and you will be ready to play.
Related guides
Continue learning with these tuning guides.
- Guitar String Frequencies
Reference chart of standard guitar string frequencies in Hz (E2–E4), how A4 = 440 Hz works, cents vs Hertz, and what EasyTuner's strobe dial is measuring.
- Standard Guitar Tuning
What standard EADGBE guitar tuning means: string notes E2–E4, perfect fourths and the G–B major third, why it became the default, and which styles assume it.
- Drop D vs Standard Tuning
Compare Drop D (DADGBE) and standard EADGBE guitar tuning: sound, genres, power chords, switching tips, and when to use EasyTuner's Drop D tuner.
Ready to tune your guitar?
Open the free online guitar tuner and follow along — reference tones, strobe dial, and auto-advance are built in.